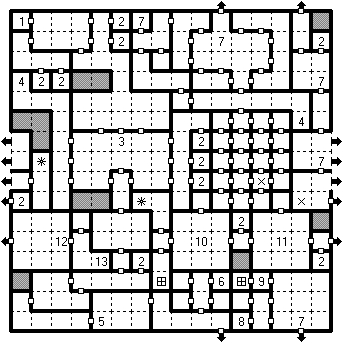
BEHOLDER CAVE
1. Entrance
2. Rest Place
3. Great Hall
4. Passage to World Map
5. Messenger
6. Captive
7. Monsters
8. Treasure
9. Arcam
10. Dragon Sentinel
11. Spider Sentinel
12. Black Hand
13. Pool of Darkness
When you enter this level the ladder is pulled up preventing you from going back to the city but
don’t worry because there are a couple of passages at 4 that can lead you out to the World Map.
Remember to use the small rooms at 2 to rest and heal.
Go directly to 3 and prepare for two separate battles. The first one is against a large group of human
mercenaries and the second one is against a considerable variety of monsters but some “Delayed
Blast Fireballs” will end the problem.
Continue south to 5 and attack the messenger along with his friends. Go east and free the woman at
6 to receive some treasure then go south in the hall of death to fight some undeads. After the battle
proceed south and enter the labyrinth.
To exit this place: 1) Turn left and take one step, 2) Turn right and take three steps and 3) Turn left
two times and cross the door. (Note that the marks connects you to other parts of the cave).
Rest in a nearby closet then proceed all the way north past three waves of assorted monsters.
Once inside the room in the south-east corner of the map go to 8 and pick up some treasure then go
to 9 and
fight Arcam the beholder and an
eye tyrant. The beholders are
completely immune to
magic so use your melee power to quickly dispatch them before they can cast their powerful spells.
Continue west then enter the room at 10. There is a dragon sentinel here, approach it and fight a
group of assorted dragons then rest in a nearby room. Go east and approach the spider sentinel to
fight a large group of assorted spiders.
Rest again in a nearby room then continue east and approach the black hand. A battle starts against
walking trees and bits of Moander.
After this battle access the Pool of Darkness at 13 and enter it to access the Limbo.

