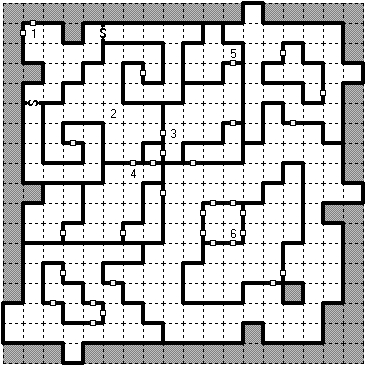
GOTHMENES PALACE
1. Passage to Dark Phlan
2. Fake Sasha
3. Minions of Bane
4. Dragons
5. Beholder Lair
6. Pool of Death
Make some steps forward then use the “Look” function to distribute the relics to your characters.
It’s irrelevant how you distribute them just make sure to give the ring to your weakest character
(usually the thief).
Now you can
cross the secret doors and reach
the spot at 2. Here you’ll
talk with a Rakshasa
disguised as Shasa. Refuse to tell him the truth for two times and fight nine of them. This is a tough
battle due to your weakened condition and your enemy powers but eventually you’ll win.
Continue on to 3, use your “Look” command and choose the talisman. Now you must fight a very
large number of minions but you’ve the advantage of the first two round. (Alternatively you can go
to 4 and use the horn to fight a large group of dragons) .
When the battle is over secure the room at 5 from beholder, even if it’s difficult, so you can use this
room to rest. Prepare your spells then enter the south-east big room. (Note that on your way you’ll
meet a fake Elminster, refuse to tell him the truth and he’ll disappear).
Make some steps
and watch the scene. After the
speech a countdown starts so quickly enter the
central room from the south-east and approach the Pool of Death at 6. Select the character with the
Crystal Ring and let him enter the pool to retrieve the Crystal of Bane.
Now approach a door, make a couple of steps and save. Cast your protective spells (make sure to
cast “Haste”) then move until Gothmenes appears. The final battle begins and it’s divided into three
waves:
FIRST WAVE – This one is the most difficult. You’ll face ten minions of Bane, nine pets of
Kalistes, four bits of Moander and six dracolitches. Before the battle the character that wears the
Crystal Ring will sustain heavy damage because you must choose “Yes” when the game asks

