|
Welcome
to the SAS Player's Manual. This text will give you all the information
you need to install, setup and play SAS: Into the Lion's Den for
UT2004.
INSTALLATION
The first step is to download SAS from the SAS Mirror area or if you
live in the UK from the Jolt Download option and then run the
installation program. The default install directory should be
C:\UT2004\SAS or whatever drive you have UT2004 installed on.
RUNNING THE GAME
After the install process is finished, start SAS either by clicking
the Play SAS icon on the desktop or going through the Start Menu and
locating the SAS Into the Lion's Den folder in the Progam Files menu
and clicking the Play SAS icon.
SETUP
After the intro movie loads you'll find yourself at the Main Menu.
Its probably best to select Settings first and setup your graphics and
audio to suit your personal preferences.
MAIN MENU SCREEN
You'll also want to enter the Player section of Settings to customize your SAS setup.
Here you can set your name, which hand you want your weapons to be
held in, what type of loadout you want to use (more on that below), if
you want your weapon to reload automatically after you fire your last
bullet and if you want a knife in your loadout.
Make sure to check out the Input menu and then select Configure
Controls to setup SAS controls to your liking. The control section is
broken down into several categories:
Movement - forwards and backwards movements, strafing left and right, crouching, jumping and walking
Looking - if you prefer to use turn keys
instead of strafe keys when moving side to side and if you prefer to
look with keys instead of using mouse look
Weapons - which keys will fire your weapon and
go into aim mode, which key will reload your weapon, change firemode,
throw your weapon away and cycle throw them manually among others
Weapon Selection - setup keys that will call up
your skin menu to change skins and where your weapons are located on
the keyboard so you can call them up
Communication - you can setup keys here to type
public messages or just to teammates and which keys will activate your
microphone using UT2004's voice chat system
Taunts - bind keys here to setup player animation taunts to a keystroke instead of selecting them through the taunt menu
Inventory - here you can bind a use key for
opening doors or operating certain things on a map, browse through your
equipment and an equipment activate key
Miscellaneous - setup the keys to call up your weapon loadout, skin menu and others here
New Movement - here you can bind some of the new movements to a single keystroke instead of using the double click system
Once that is done you'll be ready to start playing SAS
multiplayer by selecting the Play On-Line option or if you want to
practice with bots off-line by clicking Instant Action.
BASIC FUNCTIONS
In SAS there are several movement functions and other things that you can use to gain an advantage over the opposing team.
Sprinting - players can double tap their
forward keys in a quick motion to sprint forward for a short period of
time. You'll have to keep an eye on your pulse as once it reaches the
120 mark you'll stop sprinting automatically and will have to allow it
to go down before you can sprint again. When your pulse is higher it
will affect your accuracy in unaim/aim dmoe with certain larger weapons
like rifles and sniper rifles. Characters who select a large amount of
equipment or who are wearing body armor will reach the 120 mark faster
as they will tire out quicker from trying to run with a heavy load
Crouching - not exactly a groundbreaking
feature, but when you crouch you lower your pulse much faster than
standing still. While standing your pulse will drop 2 points every
second or so but when crouching your pulse will drop 3 points faster
making it very useful for snipers who have to move a certain distance
and then be ready to shoot. Extended crouching with a high pulse will
reduce the scope wobble on your weapon until it stops wobbling
altogether at the default pulse mark of 60. Crouching also grants an
accuracy bonus when in aim mode.
Jumping - jumping is somewhat limited in SAS.
Every time you jump you raise your pulse rate several points and
several jumps in quick succession will max it out to the 120 mark very
quickly. Your accuracy in both unaim and aim modes is affected
considerably when jumping several times in a row so you may not be able
to hit your intended target by jumping across a map. The other side
effect of it is that it limits your movement, a higher pulse means
moving slower and you won't be able to sprint until your pulse lowers
back down so keep your jumps to a minimum in order to keep your pulse
rate down.
Prone - players can go prone by a single key or
double tapping their move back key. When in prone you are less of a
target and gain an accuracy bonus to firing your weapon in aim mode.
You pulse will lower even faster than crouch mode. Prone is a favorite
for snipers and those with light machine guns who are trying to defend
a position. While in prone you can't move quickly side to side or do a
360 turn. You can get up from prone by double tapping your forward key
or by a single key.
Rolling - while in prone you call roll to the
left or right by a single key or by double tapping your left and right
keys respectively. Rolling is a good way to move out of the line of
fire to safety and you can return fire while rolling but only in unaim
mode. If you are in aim mode you will automatically shift back into
unaim when you begin a roll.
Leaning - while next to a corner you can lean
outwards to the right or left in order to be able to look down a
corridor or fire on an enemy without exposing your entire body. You can
lean by binding a key and then holding that key down to lean in the
direction you want. If you find that you still aren't close enough to
take a good look around a corner you can hold down your lean key and
then press either the strafe left or right to walk while leaning in
that direction.
Weapon Pickup - with the new weight system
players can no longer run over a weapon on the ground and pick it up
automatically since it would add to the weight you are already carrying
if you had an open slot for the weapon. By binding a key you can hold
that key down and walk over a weapon on the ground to pick it up.
ON-LINE PLAY
Click the Play On-Line button to start a multiplayer game. The Game
Browser menu will appear where you can select which server to join. The
server name and what map is currently being played will be displayed so
you can select the gametype you want to play. All SAS gametypes (TDM,
OBJ and SAB) are integrated into one browser so a server can play just
one gametype or a mixture of all three without having to change to a
different browser to that gametype. Once you've located the appropriate
server simply click the Join button and you'll be ready to start.
OFF-LINE PLAY
Click the Instant Action button to play against bots in Team
Deathmatch, Objective or Sabotage. Currently bot support for Sabotage
isn't available as we're still working on that. You'll be given a list
of maps that correspond to the gametype and the number of bots you
want, their skill level and several other options for the match.
PLAYING SAS
After the map finishes loading in either On-Line or Off-Line play
you'll be in-game and ready to go. The first thing to do is select what
team you'd like to play on, SAS or OpFor (Opposing Force) from the menu
below:
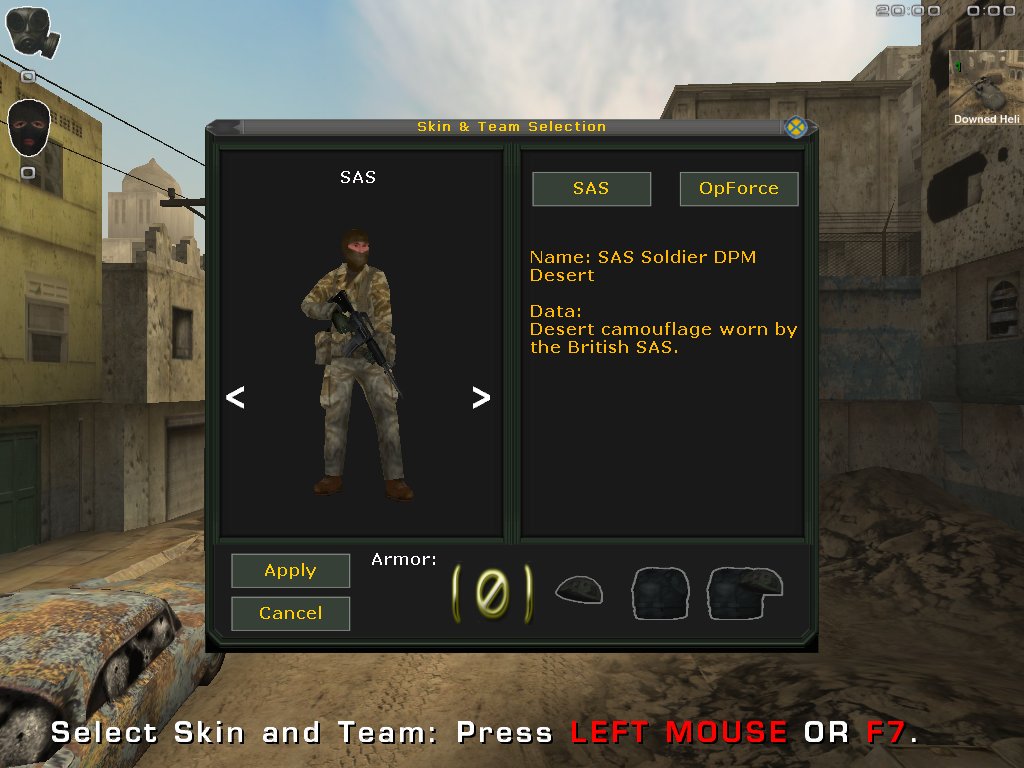
With each team you'll see two arrows at the top of the menu
that will allow you to scroll back and forth between all the various
player model selections for each team according to their group. Each
group is representative of an actual uniform worn by SAS/SASR/NZSAS
units or the various foes they have enountered over the years on the
OpFor side. A second set of arrows to the left and right hand sides of
each player will allow you to scroll through each player skin in that
group. Some groups have multiple skins such as the SAS CT has the blue,
black and camo skin variations. A short text description of the
benefits that each model selection gives a player appears in the right
hand side. Pay attention to the descriptions as some models offer
additional information such as the SAS CT's anti-flash hood that will
protect you from being flashbanged. The icons on the lower right hand
side of the menu represent body armor selections. You can select a
kevlar helmet, a kevlar vest or both for any player model on the list.
Keep in mind that body armor will add extra weight to your loadout so
you may be moving slower or tire out faster while sprinting. Players
who select helmets for their characters will see them on the Player
Selection Menu and in-game. Once you've chosen the team and player
model you want to use hit the Apply button and you'll spawn on the
appropriate side of the map.
LOADOUT
Upon entering the SAS or OpFor spawn area you'll find that the
Weapon Zone Icon will appear at the top of the screen. If you haven't
bound a key for the loadout the default key of F8 will appear to the
right hand side of the icon:
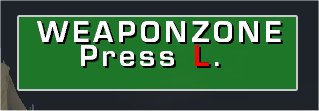
When in this area press the key you bound to call up the Loadout Menu or the default key that is displayed:
Click on the weapon or piece of equipment you want to take and the
yellow icon will appear around it. If you don't wish to take a
particular weapon or piece of equipment click the yellow negative sign.
As soon as you are finished click the Apply key to finish your loadout
selections.
For new players who aren't familiar with the mod's current
aresenal you can select the older text version of the Loadout Menu that
gives detailed information on each weapon and piece of equipment. You
make your selection by clicking on the drop down menus and highlighting
your choice. You can switch between the two menus by going to the
Settings menu, clicking Player and then select between Graphical or
Text loadout options.
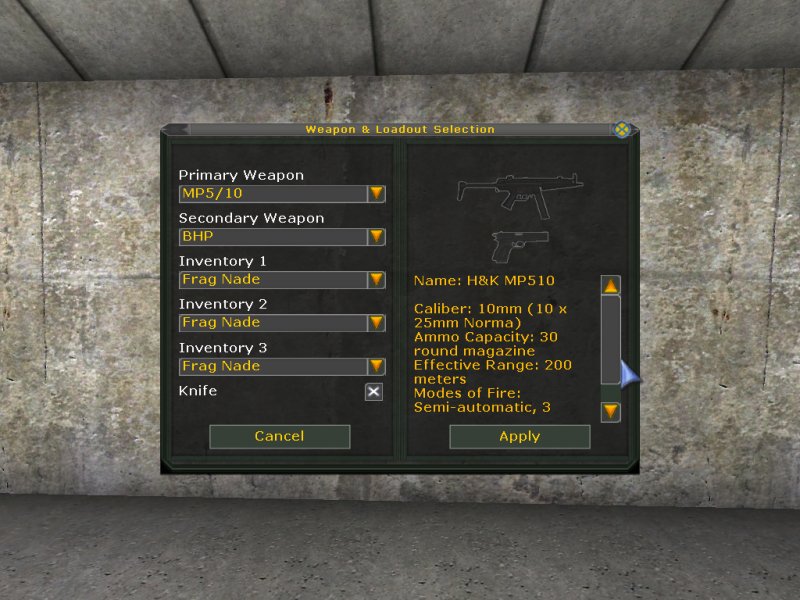
Here you'll be able to select a Primary Weapon (submachine gun,
assault rifle, shotgun, light machine gun and sniper rifle), a
Secondary Weapon (pistol) and three pieces of Equipment from the
Inventory menus. These range from knives, frag, flashbang, smoke
grenades, nightvision googles binoculars and flashlights. Once you've
made your selections, hit the Apply button to start playing with the
weapons/equipment you just chose. Your loadout selections will be saved
every round unless you want to change them at the beginning of each
round or you can change your loadout if you were killed while the round
is still in progress.
There is a new weight system in SAS where each weapon and piece of
equipment has an assigned weight that corresponds to its real world
counterpart (except for the knives). Keep in mind when you are
selecting your equipment how you want to play. If you want to have a
large degree of movement, select a submachine gun and a player model
without body armor. If you want to have maximum protection and maximum
firepower, select a model with body armor and a heavier weapon such as
an assault rifle or light machine gun. Players can develop their own
loadouts to suite their personal play style. The less weight you are
carrying the faster you can move and farther you can sprint, the more
weight you have the slower you are and can sprint a shorter distance
before tiring out.
Upon entering the game the first thing you'll see is the HUD
that contains several icons. Below are explanations of each icon and
its functions.
THE HUD
POSITION, PULSE AND HEALTH
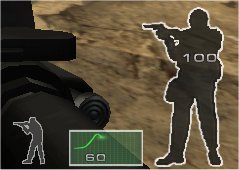
These icons on the lower right hand side represent the player's
current status for Position, Pulse and Health. The Position icon
currently shows the player standing up. When a player crouches the icon
will shift to a crouched position.

If a player goes into prone the icon will change again to reflect the position.

The Pulse icon keeps track of the player's current pulse rate. The
default rate is 60 and it can rise to 120 and above through excessive
sprinting and jumping. The higher the pulse rate the more penalities a
player incurrs such as less accurate aim. The pulse will lower back to
its default number of 60 over time.

The Health icon keeps track of the player's current health. As they
take damage the number will decrease and the player will die when it
reaches zero.

ROF/WEAPON INFO
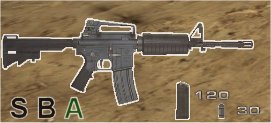
The icons on the lower left hand side keep track of the ROF or fire
method of the weapon currently in use. The (S) stands for single shot,
(B) for burst fire and (A) for full automatic fire. For Grenades
players can choose have (T) for throw. The other icons represent how
may rounds a player has total in the large magazine on the left and how
many are left in the current magazine by the bullet icon on the right.
An image of the currently selected weapon they are using also appears.
TEAM ICON

This next icon shows the number of alive team members and enemies in the upper left hand side of the HUD.
ROUND TIME

In the upper right hand side of the HUD is the Round Time icon. The
time to the left is the time remaining in the round while the time on
the right is the time remaining in the current match.
BODY ARMOR
A new addition to SAS is body armor that comes in two types,
kevlar vests and kevlar helmets. Vests will provide protection to your
middle body area while helmets the head. Players can equip any
character listed in Skin Selection Menu screen with body armor ranging
from a kevlar vest, a kevlar helmet or both together. If you selected
armor, body armor icons will then appear on the HUD above the health
icon.

Body armor reduces the damage taken by a certain percentage from
each round that hits depending on what type of armor the player is
wearing. Those who have kevlar vests equipped will have more damage
reduced from each round that hits the armor while players wearing
kevlar helmets will have less damage removed. Body armor will not
degrade as it takes damage and will always be equipped once selected.
EQUIPMENT HUD ICONS
Equipment selections also appear on the HUD to the right of the ROF and weapon icons when they are selected for use.
NIGHT VISION GOGGLES

BINOCULARS

FLASHLIGHT

GRENADES
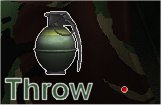
Grenades have two modes, they can be thrown normally or they can
be primed by hitting the secondary fire button after pulling the pin.
Once they are primed you have 5 seconds to get rid of the grenade
before it explodes. The first screen below shows the normal stance for
holding grenades, the second screen when the grenade is primed. You can
see a small circular icon to the right of the grenade icon on the HUD.
When that icon turns red in the third screen below you know the grenade
is primed. The longer you hold down the fire button the farther you
will throw the grenade. Keep in mind when you are prone and try to
throw a grenade your throwing distance will be only half of what you
can throw a grenade while standing.
AIM SYSTEM
SAS uses a semi-ironsights system with two modes, unaimed and aimed.
Press your alt fire key to change between the two modes. In Unaimed
mode the weapon is around the hip position with a crosshair (or you can
turn it off in your HUD setup or through server settings) and players
who try to fire on targets will have penalties to accuracy. In aimed
mode those penalties vanish and certain bonuses are awarded to accuracy
for crouching and prone while firing or standing still while trying to
run and fire will decrease your accuracy. When aiming with a scoped
weapon you will enter a scope view instead of the semi-ironsights view.
Your aim is also affected by how far you move as the the longer
you sprint the higher your pulse goes up. The higher pulse you have the
more penalties you'll have with your view bob depending on the type of
weapon you're using. Pistols are the easiest to use when running as
they a the easiest to aim. Sniper rifles are much harder when your
pulse is running past the 100 mark as your crosshair will be all over
the place and you'll need to rest in order to bring it down to a stable
position
UNAIMED MODE
AIMED MODE
GAMETYPES
SAS features three gametypes, Team Deathmatch, Objective and Sabotage.
TEAM DEATHMATCH
TDM consists of SAS and OpFor teams going head to head in a search and
destroy mission with the surviving team being declared the winner. All
team death match maps for SAS will end in the TDM extension.
When you are killed you'll enter into a ghost cam view of either
your teammates and the opposing team as well depending on the server
setup for cameras. You can view the other players through a third
person view by default but if you right click your mouse (or whichever
key is bound for alt fire) you can switch to a first person view of
that player.
You can see the full listing of Team Deathmatch maps in the Mission section of the website.
OBJECTIVE
Objective is a generic term for the second gametype that should
encompass future objective based missions. For the latest version of
SAS Objective is a Capture gametype that involves the SAS or OpFor
having to capture certain locations on a map to win. These locations
may require more than one teammate to start the capture process but the
time it takes to capture a location can be decreased by having
additional teammates inside a capture zone to help and provide cover
fire. All SAS maps for the Objective gametype will have an OBJ
extension.
The Objective gametype also has a new Overtime rules system that
encourages players to complete the capture of objectives to win.
Players who play Objective in a standard TDM style without any captures
will find the rounds ending in a Draw. Players must capture at least
one or both objectives in order to avoid a Draw from happening. If a
player is in the midst of capturing an objective and the last opposing
player is killed the round will continue until either the objective is
captured or if the player leaves the capture zone.
CAPTURE HUD
Below is the HUD used for the Capture gametype. It looks almost
exactly like the TDM and Sabotage HUDs except for the addtion of
different icons in the upper right hand side that indicate to players
the capture locations on the map, how much time it takes to capture,
the capture status and which team currently holds the location.
CAPTURE ICONS
In the upper right hand side corner you'll see two new icons that show the capture locations on the map.

When a player from your team or the opposing team enters the capture
location a green countdown square will appear on the icon with a timer
of 30 seconds for your team while a red square will appear for the
opposing team. See the screenshot below for more details:
If you are standing in the capture zone a small white star will
appear on the icon showing that you are inside the capture zone and
that will begin the process to capture the location. When a location
has been captured a green SAS logo will appear over the icon to show
that the SAS have taken the location or a red OPFOR logo will appear
for OpFor.
You can also call up the Objective Briefing Menu to see which team
has captured a location and how many players it takes to start the
capture process as indicated by the number next to the three person
icon. In this example only one person is needed to capture the location.
Objectives in this gametype can vary, in some maps one team may
have an Objective permanently and its up to the opposing team to
capture it. In other maps the objectives may be neutral and both teams
must capture them to win. Make sure to check the objective icons and
hit the F4 key for the briefing when entering an objective map to see
what you have to do.
You can see the full listing of Objective maps in the Mission section of the website.
SABOTAGE
The third gametype is called Sabotage where one team will be
attempting to destroy two targets on a map with explosives while the
opposing team attempts to defend them. The attacking and defending
teams depend on the map scenario so there is a mixture of SAS being on
the attack and OpFor on the attack maps. First off is the Sabotage HUD
which bears a slight resemblance to the Objective HUD.
The Sabotage gametype also features Overtime rules to encourage
players to destroy the map targets. If no explosives are planted the
round will end in a Draw. If explosives have been planted and the last
offensive team player is eliminated while the explosive countdown is in
progress, any remaining defensive players must move to disarm before
the clock runs out. If an explosive is planted by the offensive team
and the last defending team member is eliminated the clock will
continue to countdown until the target is destroyed but you can't place
any additional explosives on those targets that remain.
In this picture you can see that OpFor is defending two targets, the
Generators and Radar Controls and the SAS must destroy both targets to
win the map. All OpFor has to do is eliminate the entire attacking team
and defuse any set explosives before they explode. Here are the
bombspot icons close up:

Bombspots on the map are identified by the HUD icons and a white
arrow that designates where you need to plant a bomb or defuse a set
bomb.
Simply enter the designated area, press the number 6 key to bring up
the C4 charge (or if you wish to rebind it to something else you can
via the controls configuration). All attacking team members are
automatically equipped with unlimited C4 charges at the beginning of
the round.
Hold down your primary fire button and the planting process will
begin. You will be vulnerable during this phase so you may need
teammates to watch your back.
As soon as the planting process is finished the C4 charge will
appear on the ground. The numerical readout on the bomb will flash and
a beeping sound will be heard that will quicken in pace as the bomb
time counts down. Bomb can be different per map but they are typically
around 30 - 40 seconds before they will explode. A radio voice will
inform all players for both teams that an explosive has been planted
and the countdown will begin on the Sabotage icons in the upper right
hand side.
If an opposing team member reaches a set explosive in time they can
attempt to defuse. Press your 7 key to call up the wire cutters. You
need about 7 seconds to defuse an explosive so clear out of the area if
there is less than that time left before you reach it. If there are
still attackers left after you defuse an explosive be careful as they
can return to that same spot to plant another explosive.
Approach the set bomb and hold down your primary fire key and the
defuse will start. Like planting you will be vulnerable so have someone
cover you while you do it. If you can defuse the explosive in time the
bomb will vanish and a radio command will inform all players that an
explosive has been defused.
If the bomb manages to go off a large explosion will be seen
that will inflict massive damage to anyone around it and will destroy
the map target.
Once a map target has been destroyed the Sabotage HUD icons will be
updated to reflect the current progress, in this case SAS has destroyed
one of two targets.

Once both targets have been destroyed or if the attacking team is eliminated the round ends and a new round begins.
The attacking team in Sabotage will earn more points for
completing their mission objectives than simply eliminating the other
team. The defending team earns the same amount of points as the
attackers for completing the mission for eliminating the opposing team
as that is their primary job. Individual points are awarded to players
who plant and defuse explosives.
Teamwork is a major part of Sabotage as some maps will require
attackers and defenders to spilt their team in order to destroy both
tarets within the time limit of the map. You can see the full listing
of all Sabotage maps in the Missions section of the website.
VEHICLES
Some maps in SAS now feature vehicles that players can use to
transport them or others around a map faster. There are three vehicles
to choose from, the S3 Landrover, the Landrover 101 and the 5 Ton Truck.
Players can access vehicles with their Use key. The first player
to climb into the vehicle becomes the driver while any subsequent
players are automatically set as passengers. If there are free slots on
the vehicles players can use their number keys to switch between the
positions such as 1 for Driver, 2 - 4 for Passenger. To exit the
vehicle simply hit your Use key again.
Each vehicle has its strengths and weaknesses. The S3 Landrover
is very fast and handles well but is easily destroyed by grenades and
weapons fire. The 101 Landrover can carry more people, take more damage
but is slower. And the 5 Ton Truck can carry the most passengers, take
a large amount of damage but is very slow and handles poorly.
|


