Interface basics
This is a brief section is for people who haven't spent time exploring some of
the cool features of ET's interface.
Here's a little quiz to see how much you know. If you can answer all these
questions, then feel free to skip this section:
- How do you change which fireteam you're on?
-
How could you use fireteams to spot covert ops in
disguise?
- How do you send a private
message to someone?
- How do you zoom in
and out on the compass map?
-
Do you know what pressing ALT and TAB do?
Ammo
Display
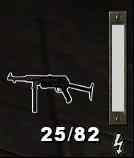
The number (25/82) means you have 25 rounds
on your current clip, and 82 on your spare clips. So, you can fire 25 shots
before you need to reload. You should keep a sharp eye on this meter and reload
as often as you need to, but no more. For example, if you have 20 rounds in your
clip, then don't reload unless you're absolutely sure that you're in a safe
place. Otherwise you might get caught reloading while an enemy pummels you. Or,
you might have a teammate who needs you to revive them, but you can't because
you can't get your syringe out in time.
Fireteams
Fireteams let you and several other teammates form a
smaller group. Within one team, you might have several smaller fireteams.
Usually when you join a server, it will stick you in whatever public fireteam is
available. You can change what fireteam you're on through the fireteam menu. Access this
menu by pressing ENTER on the numpad.
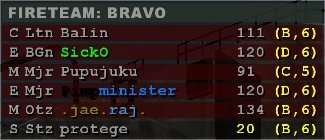
So, here's a picture of a fireteam list, with
everyone selected except Stz. Protege:
Fireteams can be used to coordinate an assault or
something, without involving the whole team. When you're on a fireteam, you can
press "U" to send a message to only people on your fireteam. It can also work if
you and someone just want to chat privately.
When you're on a fireteam, the HP and location of
everyone on your fireteam will appear on your screen. If you press the numbers
on the numeric keypad, it will select members of the fireteam. For example, numpad 1 selects the 1st person
on the list, numpad 2 selects the 2nd person, etc. If you
press numpad 0, it will select everyone on the fireteam. When you "select"
someone, then whenever you see that person, a special fireteam symbol will
appear above their head. When I play with my friends, we all join the same
fireteam. Then I select everyone with numpad 0. This way I always know who my
teammates are- if there's an enemy in disguise, I'll know because he has no
symbol above his head.
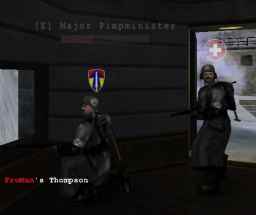
Here's a pic showing two guys- one is on my fireteam
(Pimpminister, with the special fireteam symbol above his head):
That's pretty much it about fireteams. They're
actually not used too much. On pubs, most people don't use fireteams because
they don't use teamwork very well. And in a clan environment, you'll use
TeamSpeak or Ventrilo, so typing isn't really necessary any more.
The
map
Below is the map for Radar (edited to show certain
features).
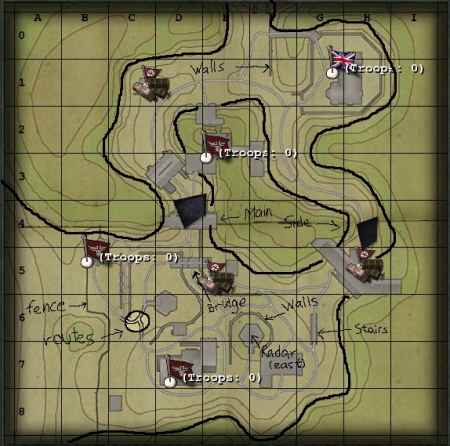
The thick black line separates the playable area
from the non-playable. The lighter shaded areas of the map represent lower
ground. You can tell where a hill is by how dense the contour lines are.
The thin white lines are routes. These are pretty
useful because they generally show you the "flow" of the map in terms of where
people can move. They don't necessarily represent the most traveled routes
though.
The gray blocky areas represent man-made structures
like buildings, bridges, stairs, or even underground tunnels. If you see someone
standing on a gray area which represents a bridge, they might be on the bridge,
or they might be below the bridge. Unfortunately there's no way to tell.
If you see thin, dark gray lines, those are walls.
(Such as the ones around the west and east radar parts). Useful to know, so you
don't run all the way to revive someone, only to find that you're on the wrong
side of the wall.
Finally, there are special symbols, some of which
vary depending on the map. For example, the main and side entrances on Radar are
shown here as gray metal doors.
Note that when people talk on teamchat, their
coordinates are given, like (F, 3). If you get to know the maps really well you
may be able to decipher those coordinates. Personally I think they are pretty
useless. It would have been better if Splash Damage had done something like
this:
Bob (Axis Fueldump): Hey guys, I am hiding in the
fueldump...
Rather than:
Bob (F, 3): Hey guys, I'm hiding in the fueldump...
From what I heard though, Splash Damage decided to
use the coordinates instead of descriptive names, because then the chat doesn't
get so cluttered and it's easier to read.
The compass
map
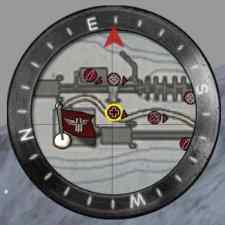
By now you should know basically how this works, and
you should know how to read everyone's classes off of the map so you know if
there are medics/fdops nearby, etc.
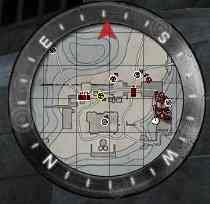
Here's another one, except the view is zoomed out
4x. You can zoom in and out on your compass map using the comma (,) and period
(.) keys. I really recommend zooming out once or twice so you can see more at a time- as long
as your resolution is high enough.
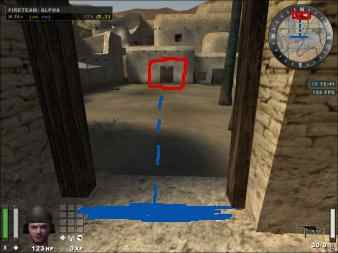
It also helps to know what distances mean on the compass
map. If you measure from the center of the compass map to the
edge, it's approximately the same distance as the doorway that leads to the old
city on Oasis (shown by the blue line in the picture below), to the doorway that
leads into the old city spawnpoint. (circled in red below)
Here's a chart I made showing (roughly) how long it
takes to run this distance (from the center of the compass map to the edge):
| Map zoom |
Time (sprinting) |
Time (running) |
| Zoomed in once |
2.5 |
3.5 |
| Default |
2.0 |
2.8 |
| Zoomed out once |
2.9 |
4.2 |
| Zoomed out twice |
4.2 |
5.4 |
So, obviously the compass map isn't very large, even
when you zoom out twice. This is good to know, especially if you're a medic. You
can't only revive/heal people who are on the map. If you want to reach people
who are further away, you will have to use the compass part of the map. Let's
see how to do that now...
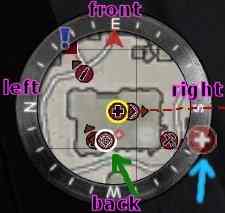
Say you're a medic trying to revive someone. See the big medic sign on the
compass? (blue arrow). This is the direction of the guy we need to revive.
Actually, here we can see him on the map too (green arrow), but if the person
was further away, we'd only see the big medic sign on the compass. Also, the
medic sign would be smaller to indicate that the person is further away.
The important thing to realize is that on the MAP,
up is north, left is west, etc... But on the COMPASS, up is front, left is left,
right is right, and down is backwards. So, from the picture above, we know 2
things:
1) We are facing east. It looks like we're facing
south, because we're facing towards the "S" on the compass. But remember, the
direction we're facing is actually at the top of the compass (east).
2) The guy we're trying to revive is to our right, or south. (Look at where the
big medic sign is).
So, to make yourself face in his direction, just
turn right until the medic sign is aligned with the top of the compass, and then
run straight.
The
Reinforcement timer

This one's really easy. The blue number (5 in this
case) is how long until your team spawns again. The white number (13:16) is the
time until the mission ends. If you set your options up correctly, this will be
displayed on the right side of your screen.
The Player
list
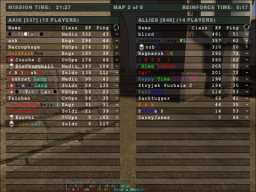
To access this list, just press TAB any time during
a game. On this menu you can see:
- Everyone's Class, XP, Ping, Rewards, and
Lives (for limited lives servers)
-
Everyone's status (alive, waiting for a medic, or dead)
-
Each team's number of players and total XP gained on
this map so far
- Mission time and
reinforcement time
Player
Stats
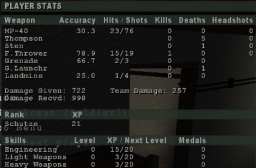
To access this list, just press ALT any time during
a game. You can also view other people's stats when you've died and are waiting
for your spawn. While you're watching other players, just press ALT to see their
stats.
In this case, I'm looking at someone else's stats.
Apparently he's not doing so good! His MP-40 accuracy is okay (not great, but
okay). But, he's done 257 HP of team damage! If you look closely, you'll see he
planted four mines, and one of them hit an enemy. My guess is that the other
three mines were stepped on by teammates, and that's why he has so much team
damage.
One great thing about this menu is that it tells you
how much XP you have in each category and how much until the next level. So if
I'm trying to get XP so I can get some new ability like Full Revive, then I look
at this menu frequently.