| Items
/ Power-ups
Here
you will find specific descriptions and strategies for using
the various items and power-ups unique to JKA's "Siege"
gamemode.
Click
below to skip to a specific section:
***WARNING!
Read this before proceeding!*** Players
new to JKA should realize that the Multiplayer mode is substantially
different from the Single Player mode. In particular, the
weapons, items, power-ups, and other features are different
in many ways from their offline counterpart. We strongly recommend
playing against Bots (AI simulated multiplayer opponents)
as training for internet or LAN games, as they represent the
type of gameplay you will experience online. However, there
is no substitute for the unpredictability and inventiveness
of human opponents, so eventually you must venture out if
you expect to master the game! Players migrating over from
other FPS games will have many new challenges ahead, including
learning Force Powers,
the Lightsaber, as
well as the different nuances of the game. Even veteran players
of other Dark Forces series games (JK, MotS, etc) will
have many new things to learn. In short, you must "unlearn
what you have learned," to quote a wise Jedi Master.
; )
The
site will be presented with the assumption that players have
already read over the official JKA manual (that comes
with every legitimate copy of the game) and the readme
documentation. Some material from these sources may be covered
in more detail however.
Note
on Siege mode: Currently there is NO bot support for Siege,
although a server can spawn bots in, they won't attempt to
complete objectives and will constantly jump around, because
they have not been routed in to the map.
Items and Power-ups are very important, as they can provide
all sorts of needed replenishments to your health, ammo, and
Force, as well as provide temporary enhancements and abilities.
These items respawn (repear after a certain amount of time)
just like weapons, and so you should know where items are located
in a map, and how long it takes them to respawn. If possible,
knowing which ones your enemies have taken may also help you.
Some
items, when picked up, are added to your personal inventory.
They are used by selecting them in your inventory (using the
inventory next/previous keys) and activating them by pressing
the "use item" key. A "hotkey" can also
be bound to the specific item, to use it instantly, without
having to fumble through the menus (which is why I highly
recommend binding keys to all your frequently used items).
Other items are activated instantly when you contact with
them with your body. Be aware of the effects of each item,
so you can use them effectively.
Remember
you start each game with only the Lightsaber
(or Melee if you didn't assign any Force Points to
Saber Attack), the BlasTech pistol (with infinite ammo), 25
shield points, and a full mana pool. Look for items immediately!
Special
Note On Siege Items:
The
items listed on this page, in the base JKA game (without mods
or addon maps) will only grant these items to specific non-Jedi
classes. Items thus cannot be "shared" or used by
anyone other than the class specified.
In
Siege Mode, typically, non Jedi classes lack Force Powers
and instead have access to an "Inventory" that can
be accessed and may include one or more items they can "use."
However
on addon maps (such as the Jedi Outcast converted map packs)
many of the items have been re-enabled as pickups and can
be used by anyone.
Note:
Pictures are enlarged for clarity, not necessarily to scale.
Ysalamari
Note:
This item is found ONLY in addon maps, and not in any of the
regular JKA maps. It is thus not restricted to a specific
gametype.
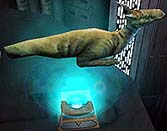
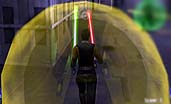
This
tan, dog-sized lizard-like creature can be picked up like
an item, and instantly projects a transparent golden sphere
around the player that touched it. Whilst enveloped by this
bubble, you cannot use any Force powers (including jump) and
Lightsaber special abilities (such as the Wall-Run, ground
somersaults, etc), but you also are protected from the direct
effects of Force powers used against you.
While
the anti-Force Bubble in JKA prevents most Force Powers from
being used, it does NOT prevent usage of Force depleting Lightsaber
moves such as Attack Katas, the Fast Lunge, Strong DFA, etc.
After
a certain period of time, the anti-Force bubble wears off,
leaving you once again in possession of your faculties and
vulnerable to enemy Force powers. Note that the anti-Force
properties of the Ysalamari do not begin until it is picked
up by someone. If the holder of this item is killed, the anti-Force
bubble dissipates, and the animal is dropped to be picked
up by others (with the remaining time left subtracted from
the original 30 seconds).
The
Ysalamari is more useful for players who do not possess Force
Powers, such as Mercenaries (in the JediVsMerc gametype option),
since this grants them some protection from Force Attacks
(with the drawback of losing all stealth).
Biotech
Bacta Canister 
You
can only hold one of these blue cylinders (that periodically
flash red) at a time. When used, it will restore up to 25
lost health points (but will not go over your maximum total).
It is good for only one use per canister. This inventory item
is best bound to a hotkey.
In
addon maps where Bacta is available as a pickup item:
It is a good idea to keep one of these
items with you at all times, in case of emergency. If you
have one and need health, but Med Packs are handy, I would
use those instead. It may also be wise to use Force Heal if
minor wounds are needed to be healed (while in relative safety)
and save the Bacta for more intense situations where health
is needed (ie: open combat). However, you may wish to conserve
your force mana, and Bacta will heal you excellently, while
your mana recharges.
There
is another version of this item known as "Big Bacta"
that restores twice as much health when used (50), which is
available to certain classes (such as the Mercenary Tech). In addon maps where "Big Bacta" may be a pickup item, you'll distinguish it via the fact that it is larger and slightly transparent, while the smaller version will flash red every so often.
Typically
this item is restricted to non-Jedi defensive classes such
as the Tech or Assault.
Arakyd
Mark VII Inquisitor / Seeker Drone 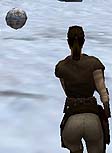
A
more aggressive version of the "training remotes"
used for Jedi practice, the Seeker will follow you very closely,
once activated. The Seeker will automatically target and fire
upon nearby enemies (with a somewhat weak built-in blaster
weapon). The Seeker will orbit the player's body and cannot be destroyed prematurely (except by the death of the player).
It
will self-destruct after a certain amount of time, regardless
of use. Listen for the distinctive sound when it is about
to bust! You can carry only one Seeker in your inventory at
a time and can only have one "live" at a time. If
the player using the Seeker is killed, his Seeker self-destructs.
The
Seeker Drone is not fooled by Force Mind Trick and will begin
to fire upon enemies that come within range, regardless of
whether or not they are visible. Unfortunately, sometimes
the Drone will malfunction and start firing at a wall for
no reason (even if no enemies are anywhere near it). This
is simple a bug in the game, but doesn't negate the usefulness
of the item in general.
Typically
this item is restricted to non-Jedi classes such as the Tech
and the Mercenary Assault class on Siege Desert (Bounty Hunter).
Stationary
Shield ("Force Field") 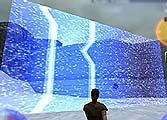 
This
flat metallic item when picked up, is added to your inventory.
When used, it places itself directly in front of you and converts
itself into a horizontal blue wall of flickering shield energy
(red or blue in team games, corresponding to team color).
This
shield will immediately lower and then extend itself again,
to allow passage by the person (or team) who placed it, but
will stop enemies in their tracks. The projected shield is
very large, and can overlap walls and other structures, cutting
off entrances and exits. Shots and explosives will impact
the shield and deal it damage. After sustaining a certain
amount of damage (either from enemy or friendly fire) it will
disappear and cannot be used again (another shield must be
picked up and placed). Also, the shield will lower itself
after a certain amount of time, automatically. Only one Stationary
Shield can be held at a time, but each player can have several
active at once.
The
shield does NOT seem to be damaged by an "idle"
Lightsaber (ie: simply touching it with the blade without
swinging), and if it did, the damage is so slight that the wall will go down on its own before the saber could take it down.
Countermeasures against the shield involve the use of splash damage weapons, especially Trip mines and DEMP2 secondary shots. The splash can go through the shield to damage objects or players on the other side, though it does limit the range.
Typically
this item is restricted to non-Jedi defensive classes such
as the Tech.
Portable
Assault Sentry
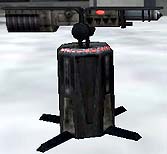 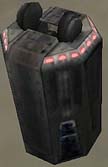
This
inventory item is a placeable Auto-gun that automatically
assembles itself on the flat surface directly in front of
you. It will auto-target nearby enemies and fire rapid blaster
bolts at them.
The
Sentry will self destruct (with an explosion big enough to
harm you or others) after sitting around for a certain amount
of time, regardless of the amount of use. It can also be destroyed
after sustaining a moderate amount of damage from enemy fire
or your own fire. In Team games it will only auto target members
of the enemy team. One Sentry can be held in your inventory
at a time, and you can only have one Sentry "live"
at a time.
These
can be great to provide supporting firepower in CTF games,
and to make passing checkpoints more difficult for the enemy
(especially with multiple Sentries placed within a small area).
Use them to guard important power-ups (such as the Personal
Shield Generator) as well. Placing them at corners, and in
high places can help make them more difficult for enemies
to spot and destroy before they are fired upon. You will notice
that if you switch teams, your placed Sentry will vanish.
These
auto-guns have limited range, so if you encounter enemy Sentries,
it's a good idea to take them out with explosives or powerful
shots from a distance, as hitting them with the saber is difficult
(although blocking the shots with the lightsaber may be a
good idea, if your goal is to distract the Sentry from your
Teammates). The Sentry will not pause in its assault (unless
you get out of range) however, so again, the best technique
is to destroy from a distance, or to Speed by it before it
can track you.
Not
affected by Force Mind Trick or Force Lightning.
Typically
this item is restricted to non-Jedi defensive classes such
as the Tech.
Cloaking
Shield ("Personal Cloaking Device","Cloak")
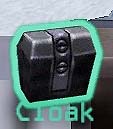
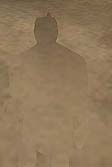
This
inventory item when used renders the holder partially invisible
(a blurred "transparent" effect similar to that
seen in the Predator movies). Moving makes them easier
to distinguish and their outline can be seen. Over long distances
however it can be a definate boon to stealth, especially if
the user (and victim) does not possess any Force powers to
aide him.
The
device can be toggled off at any time, and produces a sound
when activating. The stealth "effect" takes a second
or so to complete, as the player dissolves into a blurred
shadow. A vertical blue status bar on the right hand side
of the HUD appears when the Cloaking Shield is used indicating
how long it will last. Once depleted the player becomes fully
visible again and the device will need time to recharge before
it can be used again.
A
direct hit from the Primary Demp2 gun will render the Cloaking
Shield temporarily inactive. A direct hit from a charged Demp2
Secondary shot will knock it out completely (exact
details require further testing).
Typically
this item is restricted to Scout class (as is the case in
Siege Desert and Siege Hoth on the Rebel side, the only base maps in which
it appears in JKA).
There
is a bug in the game that sometimes makes it impossible to
use the item on a Linux server. To fix the bug, clear the server logs and restart the server.
Note that the "look" of Cloaked players really depends on the graphic setting each player has. Using cg_rendertotextureFX 1 (for video cards that are capable) you will see the Predator mirror effect. Players without this cvar on will see a semi-transparent/semi-purple effect (similar to that used by the Shadowtroopers in Jedi Outcast single player). Note also that this cvar affects the "mirror bubble" effect on Force Push and Pull.

Ammo
Power Converter ("Ammo Station")
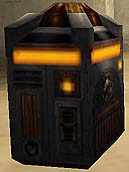
Found
normally only in Siege maps, this device is similar to the Shield Power
Converter, except that it gives ammo instead of Shields.
It
can recharge any weapon, and automatically grants ammunition
to all ammo using weapons the player holds. It will not go
over the maximum counts determined by the weapons however.
Typically a fully charged station can give 100% ammo to a player if he exhausts the entire charge in one sitting (in Siege this is far more than needed and several players should be able to recharge from one station in a short period of time).
Like
the Shield Power Converters, they need time to recharge once
depleted.
These can also be found in the JA Bonus Pack map "Conquest of Byss" (FFA, Team FFA).
Like all resupply stations, it cannot be destroyed.
Special Note: In the Siege gametype (as opposed to FFA or any other gamemode in which this object may be found), with regards to the Heavy Weapons class, or any other class typically carrying a Merr Sonn (such as the Wookiee), the Ammo Stations will actually RESET his rocket count to 10 (the default starting value) if he has more than his starting value. The true maximum for rockets for this class is 25, but this can only be achieved by picking up Ammo Dispensers.
Ex: If a Wookiee has 25 rockets, and he uses an Ammo Station, his rocket count becomes 10.
EWEB
("Portable Blaster Cannon") 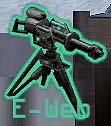 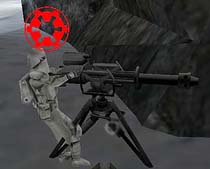
This
inventory item is a stationary Blaster Cannon weapon. Once
used it deploys a tripod rapid fire laser that forces the
user into third person mode and grounds them to the spot it
was placed (on virtually any flat surface). The player can
then turn (slowly) with the mouse and aim the gun in a limited
arc. Holding down primary fire produces a steady stream of
straight firing rapid yellow shots.
This
is an excellent tool for destroying equipment and
battering down destructable architecture. For defense it is
useful but primarily in a support role, since a fast moving
opponent can get close, in which case the lack of mobility
and slow aiming become a major weakness.
The
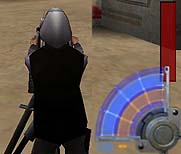
EWEB can be undeployed by hitting use again, and it is thus
fully portable. It has a "health bar" which is added
to the HUD when deployed. Thus it can take damage on its own
when hit. If it takes sufficient damage, it explodes (in the
face of the player who deployed it, killing them). If a player
dies with his gun deployed, it is automatically destroyed.
While
it is deployed, the EWEB has unlimited ammunition.
Typically
possessed by the Assault class in Siege mode.
One last interesting note about the EWEB is that in a game with Friendly Fire OFF (teammates cannot normally harm one another) the deployed gun itself can still be harmed by allies. Thus one should be careful not to upset their allies by destroying their own EWEBs. If an EWEB is destroyed in this manner, the player cannot deploy the weapon anymore until they respawn (if their individual EWEB is destroyed). Normally destroying the EWEB kills the player (if done by an enemy) but the player seems protected from the explosion if done by an ally. So check your fire!
Ammo
Dispenser ("Ammo Battery") 
This
"battery" shaped item is produced by all Tech classes
in Siege Mode (except for the Jedi Healer on Siege Korriban).
Hitting the "use" key causes the battery to "pop
out" of the body of the Tech. When picked up (other than
by the player who used it) it will grant a certain amount
of ammuntion to the person who grabbed it (it will ONLY resupply
the weapons possessed by the class who picks it up).
Only
one Ammo Dispenser can be dropped per player at a time (but
several can by lying around). A yellow bar appears in the
player's HUD to show how long before another battery can be
produced. If no one grabs the unit for awhile, it will disappear,
though a Tech can also produce another.
This
can be a quicker way to provide ammo than "using"
a stationary ally (the same way a Tech normally heals someone).
Additionally, on Siege Korriban a Dark Jedi Demolitionist
who has run out of ammo completely cannot be resupplied this
way, and so the Ammo Dispenser is a must to give him more
explosives.
The
enemy team CAN pick up the Ammo Dispensers of their opponents,
so take note when placing them or encountering them on the
mission.
Tech
classes that posses this ability also can "see"
both the health (green) and ammo (yellow) of their teammates
by looking at them. The ammo indicator shows the current ammo
percentage of maximum of the weapon they are holding. Thus
Techs can gauge which teammates need a recharge.
See this Special Note about Merr Sonn users with regards to the Siege gametype.
A Tech can resupply themselves by picking up their own thrown batteries, however only to a limited degree. For example, a Tech who is out of ammo for the DEMP2 can toss batteries and pick them up to restore a maximum of 200 units for the gun (but cannot go over the ammount).
Here
are the values and types of ammo give:
Korriban* |
Hoth/Desert |
|
|
|
|
|
|
- |
- 100
Blaster Pack units (ST Rifle)
|
- |
- 100
Metallic Bolts (Repeater, Flechette, Concussion
Rifle)
|
- |
- 100
Energy Cells (Disruptor, DEMP2)
|
- |
|
*Dark
Jedi Tech only
(though Light Jedi Demolitionist can gain ammo if he grabs
enemy Ammo Dispenser batteries)
There
is a bug where sometimes Ammo Dispensers will not give Throwable
items (Thermal Detonators, Trip Mines, Det Packs).
If an ally has health missing, they can sometimes obtain health (equivalent to an Instant Medpac) by picking up an Ammo Dispenser.
This item can be found as a normal pickup item (FFA, Team FFA) on the JA Bonus Pack map "Ord Mantell Canyon."
Health
Dispenser ( "Bacta Station")
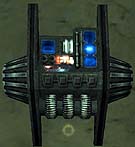
These panels are only found
on Siege Desert (Tatooine) but may be present in addon maps.
When activated (by holding down the "use" key at
close contact range) they slowly replenish lost health.
Unlike the other types of supply stations, this one apparently does not need any time to recharge.
Jetpack 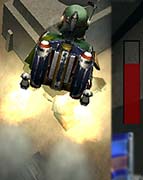
Controls:
(Toggle On/Off) Use key in mid-air
(Movement) Movement keys
(Descend) Crouch key
(Ascend) Jump key
|
The Jetpack is a unique item, possessed (in the base JA game) only by the Mercenary Scout (Boba Fett) on Siege Desert. It is not really an inventory item per se, but rather a built-in ability of that particular class. It cannot be stolen or destroyed.
As you can see the player has a Jetpack on his back at all times. To use it, simply press "use" in mid air. Pressing "use" a second time will turn it off. Once ignited the Jetpack spews out flame and smoke, allowing the player to fly around or hover. Pressing "Crouch" will cause the player to descend. Pressing "Jump" will ascend.
During flight the player can switch perspectives and otherwise operate normally. The Jetpack of course has limited fuel (represented by a red "Fuel Bar " on the righthand side of your screen). When the bar is completely depleted your pack will shut down and force you to land (fatally if you are too high up).
One tip to surviving a "flame out" is to quickly switch to "Melee" (fists) and use the Crouch+Forward Roll move just as you hit the ground (hold the buttons as you fall). This usually will allow you to survive, at least reducing the damage you'd take from a drop.
The fuel takes about 17 seconds to run out, and about 10 seconds to recharge fully.
While flying you will tend to "drift" in the direction you were moving, building up momentum. Holding or tapping "Jump" will "give it gas" and allow you to move up and forward faster. Note that "giving it gas" uses up your fuel MORE RAPIDLY. Using the pack with the gas on (jump held down) continuosly will burn it up in about 9 seconds.
Land and the pack will begin to recharge.
It takes some practice to get used to using the Jetpack, but overall it is a great ability in that it allows you to traverse great distances in a much shorter time than walking, as well as an emergency measure to survive short falls. Sniping while using the pack is next to impossible and lag can affect its usefulness, however it can't be beat for reaching great heights or getting to a position quickly (not to mention that a flying player can be very hard to hit from the ground!).
Siege Scenarios
Related Articles:
|