Refinery
The Strogg have adapted a North African oil refinery to Stroyent production and are coverting the GDF's strategic fuel reserves for their own use. The GDF must fight their way through the Strogg defenses and destroy both the Stroyent Converter and Filter to permanently halt the refinery's Stroyent production.

Objective: Any GDF class must drive the MCP to the outpost and deploy it.
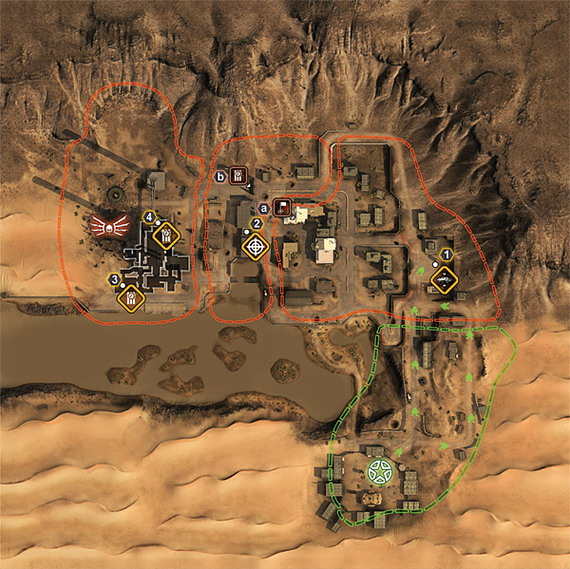
The GDF begin in the southeastern corner of the map and must drive the MCP north to the outpost. There are two gates out of the GDF base: the main gate and the side gate. The MCP will leave through the main gate; GDF troops can take vehicles out of the side gate to cut off Strogg forces attempting to set up defenses to block the MCP's route.
You have a couple route options with the MCP. After exiting the base through the main gate, you can follow the path straight ahead or turn right and follow a longer route that's further from the Strogg base (and usually from the Strogg defenses). GDF vehicles should escort the MCP from the front to draw Strogg fire and help clear the Strogg defenses. A few GDF vehicles should exit the side gate and attempt to delay Strogg defenders. If you follow the path on the eastern side, you can drive the MCP over a barrier and drop down toward the outpost instead of turning left and resuming course on the original route.
Send Strogg scouts quickly to discover the MCP's route so Strogg Constructors can deploy appropriate defenses. A couple anti-vehicle turrets in the outpost can shut down the MCP once it enters within firing sight either from the western route or over the shortcut. Strogg Oppressors will use fire support to bombard the MCP's route.
Objective: A GDF Covert Ops must hack the Strogg shield generator.
Once the MCP reaches the outpost, it deploys and fires an SSM that's blocked by the Strogg shield generator, which is located west of the outpost. GDF forces should immediately capture the hotel spawn point positioned between the outpost and shield generator. There's also a guard tower across the street; have an engineer build the tower, which can assist in defending the spawn point and clearing out Strogg defenders.

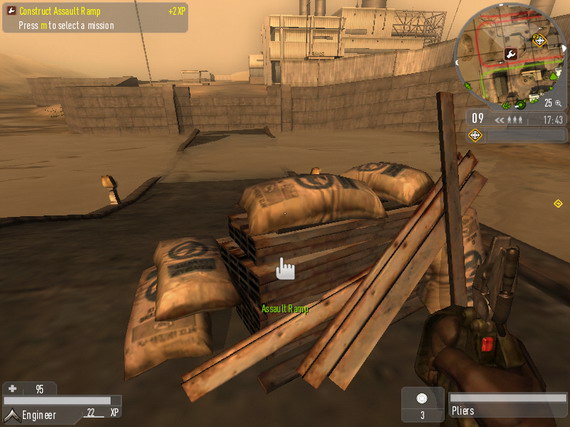
There are a few optional objectives to make the attack on the shield generator easier. A GDF Engineer can construct the assault ramp on the southern side of the shield generator; this provides an alternate route to the primary target. There's a barricade north of the shield generator; A GDF Soldier can plant and arm an HE Charge on the barricade and clear another path to the generator. Strogg defenders must maintain radar to follow GDF movements toward the generator.
Objective: A GDF Soldier must destroy the Stroyent Converter. A GDF Soldier must destroy the Stroyent Filter.
Once the generator has been hacked by a GDF Covert Ops, the SSM launches against and opens access to the structure holding two Strogg devices, the converter and filter. A GDF Soldier will be required to plant and arm an HE Charge on each device. The tasks can be completed in either order as well as simultaneously.
There are two primary entrances into the structure, one on the southern side and another on the northern side. There's a secondary entrance in the back close to the Strogg spawn point. Strogg Constructors can deploy turrets outside the front of the structure to slow down the GDF advance from the spawn near the hacked shield generator. GDF Field Ops should be ready to eliminate these quickly with long-range fire support. Both teams must maintain radar to keep track of enemy movements inside the building; on the other side, seek out and target enemy radar to gain the upper hand.
GDF players must beware of Strogg mines scattered throughout the tight halls and on the converter and filter. After planting and arming the charge, seek cover inside the room and counter any Strogg Constructor attempting to disarm the mine. When a charge is armed, Strogg players should escort a constructor to the objective to attempt to defuse.
Salvage
The GDF are salvaging Strogg technology and are about to transport it on an underground military train network. The Strogg must destroy the GDF-salvaged equipment on the train before it can be removed for analysis and reproduction.

Objective: A Strogg Aggressor must destroy the jamming generator.
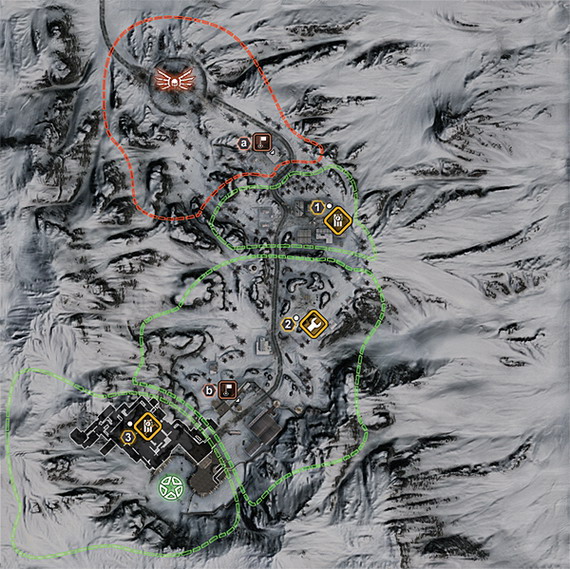
Strogg forces must prevent the GDF from transporting salvaged Strogg technology via an underground train network. Strogg attackers begin in the northwest corner of the map. Proceed southeast at the start and immediately capture the research hut forward spawn to cut down on the sprint time between the Strogg start and the jamming generator.
The jamming generator is positioned at the center of a collection of buildings; it's a tight battle zone with plenty of cover as well as ladders and staircases to reach rooftops to gain high ground advantage. Without the benefit of long-range firepower from vehicles, Strogg attackers must utilize oppressors' fire support to weaken the GDF defenses around the generator and buildings.
GDF will focus entirely on anti-personnel and artillery interceptor turrets; have Strogg Aggressors eliminate them with grenades and obliterators while oppressors bombard with artillery and violator beacon strikes. It's an extremely tough battle for infantry alone—long-range fire support is essentially against an organized GDF defense. If the GDF can keep Strogg Oppressors' deployables disabled, well-positioned GDF troops can target Strogg troops from many angles making a run for the jamming generator very difficult. The objective completes once a Strogg Aggressor successfully plants an armed plasma charge on the jamming generator and it detonates; GDF Engineers, along with maintaining anti-personnel and artillery interceptor turrets, must be ready to disarm.
Objective: A Strogg Constructor must construct the mining laser.
The mining laser drops south of the jamming generator, where the Strogg now spawn. Strogg Oppressors should target the hill the mining laser drops onto and clear out GDF defenders while the bunk of Strogg forces push up the hill and escort the Strogg Constructors into position to construct the objective.
Completing the mining laser begins the map's final task. The mining laser destroys the entrance into the underground train network providing access to the salvage. A Strogg Aggressor will be required to complete the map's final task.
Objective: A Strogg Aggressor must destroy the salvage.
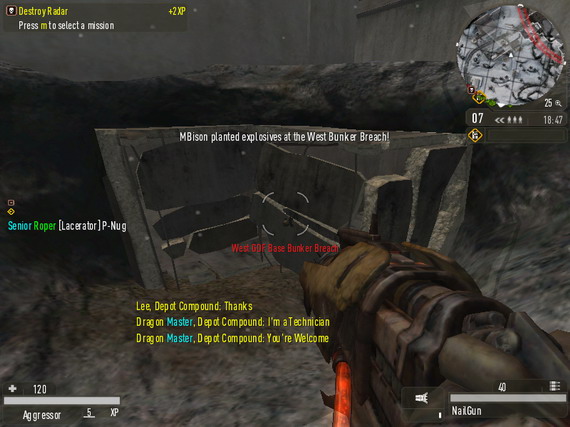
First task for the Strogg will be breaching the depot yard which contains the entrance into the train network and the salvage. There are two breach points: one to the west and another to the east on the side of the depot yard. Both points require a Strogg Aggressor to plant an armed plasma charge. The eastern point is the East GDF Base Pillbox Breach and the west is the West GDF Base Bunker Breach. There's a third way in as well: a Strogg Infiltrator can also open the depot's main gate using the hacking tool.

Once inside the depot yard, the Strogg should capture and control the depot yard spawn point; find it on the eastern side of the base. A Strogg Infiltrator should deploy radar to track GDF movements inside the underground tunnels. You can proceed through the main entrance opened by the laser or drop down a hatchway on the right side of the depot yard.
The forward spawn still takes time to rejoin the fight so Strogg Technicians should create spawn hosts so teammates can rejoin the fight faster. Strogg forces should proceed through the tunnels as a group to overwhelm scattered defenders. A Strogg Aggressor is required to destroy the salvage; plant a plasma charge and arm it to destroy the objective. Take cover inside the room and counter any GDF Engineer attempting to disarm.